Gesture Controlled Car with Accelerometer
This project consists of a car being controlled by a remote glove which the user wears to control the car. The glove contains an accelerometer which detects the change in orientation and movement on the glove. This information is then sent to the car through bluetooth modules which instructs the car to move or turn in a certain direction.
| Engineer | School | Area of Interest | Grade |
|---|---|---|---|
| Sai Akhil M. | Leigh High School | Engineering | Incoming Junior |

Final Milestone
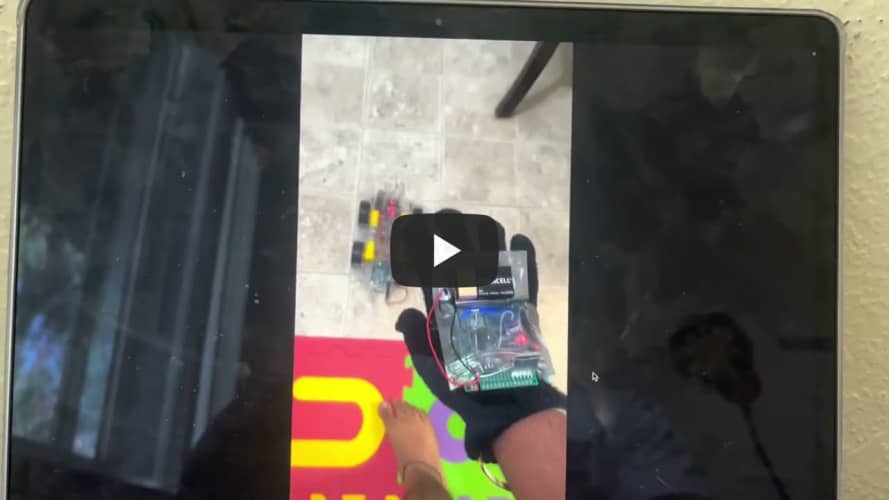
Although my gesture controlled car is fully operational, I decided I would make some minor changes to improve the functionality of my project. First of all, I had to replace a deformed wheel on my car. One of the wheels on my car had a plastic deformity in its hole that connects to the motor’s shaft. This made the wheel constantly pop off while the car was rolling on carpet or when it is bumping into something. When I ordered a new wheel and replaced the old one with the new one, the problem was solved. Secondly, I decided to add an on and off switch to my car to make it easier to use. Before, to turn on my car, I had to plug in two small metal wires into these female jumper wires. This was not very functional because the metal wires are very loosely connected to the male wires and this caused the car to power off. So I decided to solder a switch onto to the car to fix this problem. Lastly, my car was not very fast because the 9 volt batteries I was using kept dying too quickly because my car required lots of voltage and current. I replaced them with six 1.5 volt batteries to solve the problem of needingn to replace the 9 volt batteries. Inadvertantly, this also made the car much faster because the six 1.5 volt batteries sent in more current than a single 9 volt battery.

Third Milestone
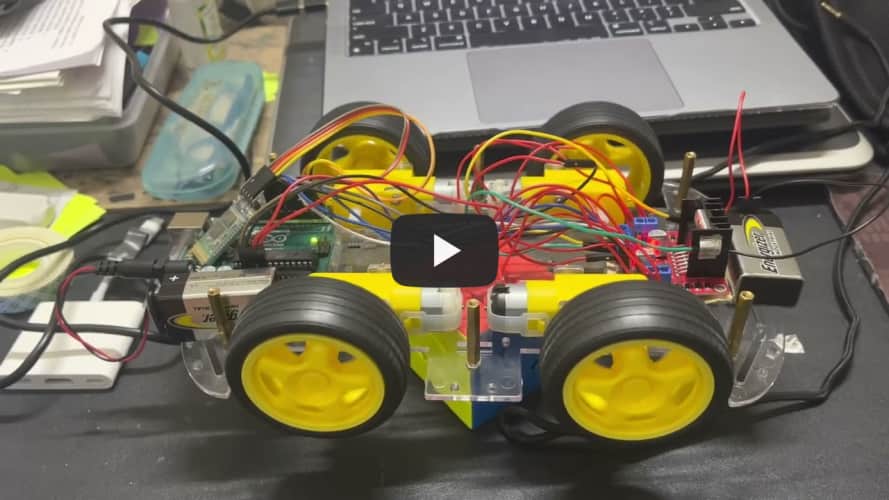
For my third milestone, I had to finish constructing my gesture controlled car and the glove. But most importantly, I had to get it to function. To do this, I started off with obtaining some code that looked like it would work for my robot. After changing the pin defenitions to match my hardware, I had to change the code so that one arduino actually sends information to the other arduino through bluetooth. After learning the write commands to send information from one arduino to the other, I was able to get my car to work. Although, another problem arose. The wheels were turning very inconsistently. All four wheels would rarely operate all at once. I realized that this was likely because of a hardware or power issue. When I replaced the batteries for new ones, the car and controller operated perfectly. Lastly, I decided to transfer the electronics for the glove, from the breadboard to the perfboard. I soldered everything onto the perfboard and the project was fully functional.
Second Milestone
My second milestone was to get all of the wiring for my hardware set up. I was able to build and test all of my motors, bluetooth modules and accelerometer for car and controller glove. I got them to work by connecting them to an arduino and uploading some sample code to get them up and running. Some challenges I’ve faced during this milestone was getting the motors set up and working correctly. Because I didn’t have a soldering kit, I had to carefully fold the metal ends of the wires into the motor’s copper holes. This was challenging because if the connection was not secure, the motor would not receive power and would stop working. After this, I had to get my bluetooth modules paired so that I can transfer information from my controller to my car.
First Milestone
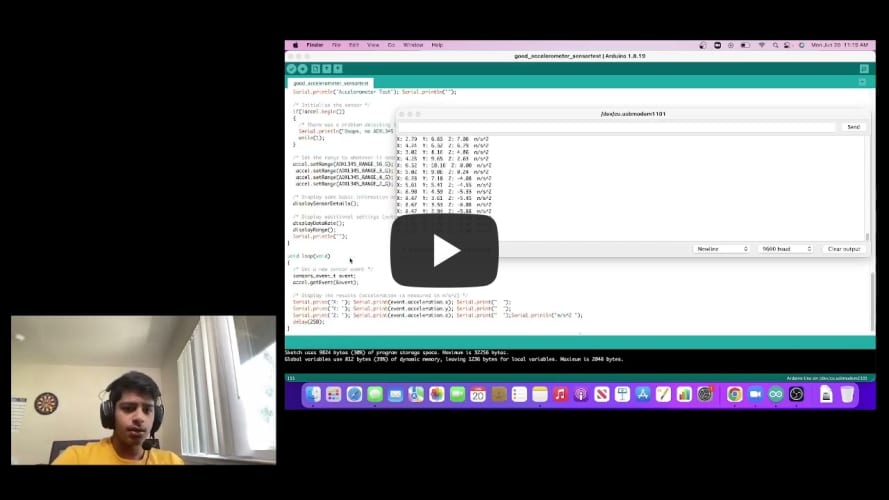
My first milestone was testing to see whether my accelerometer was functioning properly. The accelerometer is one of the main sensors in my project and it is the sensor which gives values to the vehicle while I change the orientation of my hand and make gestures. To test my accelerometer, I had to connect my accelerometer to a breadboard which had to be connected to the arduino uno. I connnected the arduino uno to my laptop which had code running, to view the values of the accelerometer. This first milestone took more time than it was supposed because I ran into some big problems. I couldn’t get my acclerometer to give any values, but it seemed like both the software and hardware were correct. After a few days of debugging and testing different accelerometers, I learned I wasn’t supposed to connect all 10 of the accelerometer’s pins to the breadboard, instead I was supposed to only connect the 4 pins which were needed for the arduino.
Bill of Materials
| Part | Quantity | Description | Cost |
|---|---|---|---|
| Car Chassis Kit | 1 | A car kit with frame, wheels and motors. | $19.99 |
| Male to Female Wires | 10 | Wires used to connect arduino with motors and drivers | $1.95 |
| Male to Male Wire | 4 | Wires used to connect arduino to accelerometer and bluetooth module | $1.95 |
| 9 Volt Batteries | 2 | Standard 9 Volt Batteries | $8.99 |
| Arduino Uno | 1 | Programmable microcontroller board | $29.95 |
| L289N Motor Driver | 1 | A device that controls all motors for the vehicle | $8.99 |
| HC-05 Bluetooth Modules | 2 | Allows communication between two modules wirelessly | $13.39 |
| Arduino Micro | 1 | Mini programmable microcontroller board | $19.38 |
| ADXL345 Accelerometer | 2 | Device that measures the change in orientation on the X, Y, Z axis | $13.59 |
| Perfboard | 1 | electronic circuit holder | $5.99 |
| Rechargeable 1.5 Volt Batteries | 6 | Rechargeable 1.5 Volt Batteries | $21.99 |
| Battery Holder | 1 | Battery holder for holding 6 1.5 Volt Batteries | $6.99 |
| On and Off Switch | 1 | A switch to turn battery on and off | $1.99 |
| Glove | 1 | A hand glove to attach electronics for gesture controller | $2.30 |
| Hot Glue Gun | 1 | A hot glue gun used to attach electronics to car and glove | $15.99 |
| Double Sided Tape | 1 | Used to attach electronics to car | $5.00 |
| Soldering Kit | 1 | Soldering kit with electrical tools and lead to solder the electronics | $19.99 |